
CURRENTLY VIEWING |
||||||
|
FACE IMAGE RELIGHTING
Relighting of a face in a 2D image, given only a single image
|
||||||
 |
||||||
|
@
programming > computer vision
|
||||||
|
SECTION MENU
|
||||||
In this project, we are trying to relight a face in a 2D image, given only a single image as reference. A 3D face model is obtained first by using a morphable face model. The matching/optimization then starts to find the best weights for the morphing so that the 3D morphed face matches the underlying image as best as possible. Finally, we relight the synthesized 3D face model and composite it back onto the 2d image to obtain the results.
Video showing the matching process and results
The basic idea of this technique is based on “A Morphable Model for the Synthesis of 3D Faces” by Blanz and Vetter, 1999.
We achieve our results in 3 steps. We first sample face data and build our own morphable face model. Next, we do an optimization of the morph weights so that the morphable face model morphs as closely to the underlying 2D image as possible. Finally, we relight the morphed face and composite it back onto the original image.
Step 1: Data Sampling and Model Building
We first obtain samples from a powerful face generating program called FaceGen Modeller. We should be using scanned face data instead for better samples, but using FaceGen to obtain samples is fast and correspondences between the models have already been established for morphing, which saved us a lot of work. 20 samples of Eurasian female faces aged between 20 to 40 years old approximately were collected.
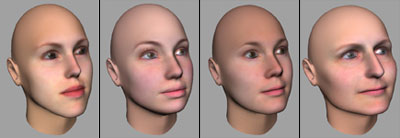
4 out of the 20 face samples collected using FaceGen Modeller
These 3D face meshes were processed in Maya to remove portions of the head, neck and ears automatically using MEL scripts. Vertex colors were also assigned based on texture information.
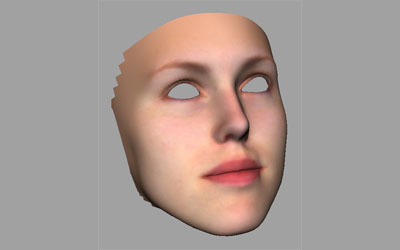
Face after processing in Maya
The processed face meshes were exported in our own format and then fed into an OpenGL application for visualization.
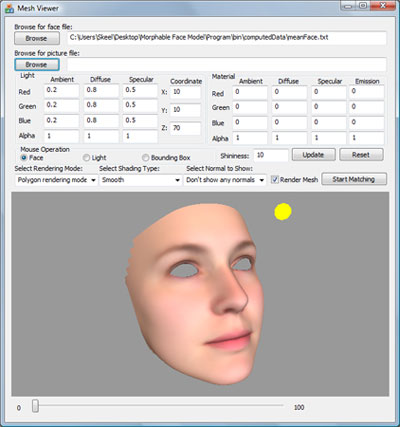
The OpenGL application used for visualization
PCA (Principal Component Analysis) was done on the sampled set of faces so that we can get a mean face and a set of eigenvectors/values that represent the offsets from the mean face.
Step 2: Optimization
Now that we have the mean face and the set of eigenvectors/values, the problem is reduced to finding appropriate weights for each eigenvector so that the summation of the weight x eigenvector, after adding to the mean face, will give the morphed face which we desire.
We used a form of half-interval search to narrow the weights to the optimum. Each iteration reduced the interval by two-thirds. We stop usually after 5-6 iterations because the interval is reduced to such a narrow interval that any changes of weight within this interval will not produce a visible change in the face model. An animated visualization of the optimization process can be seen in the video in the introduction section above.
Only 5 eigenvectors were used, to save calculations. Nevertheless, the results produced were pretty decent even with this small number of eigenvectors used.
Model transformations, lighting and material attributes were treated as constants dueing the optimization process. This means that the results relied on good initial estimations of these attributes by the user.
Initial tries did not produce satisfactory results because it was too hard to match the face together as a whole. We decided that the different parts of the face should morph independently of one another. Thus the face model was segmented. This helped to provide much better results.
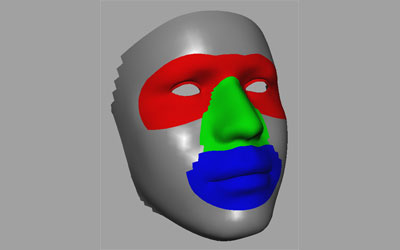
Segmenting the face for independent morphing of each prominent face feature
Blending of the vertices across the segments was then done to provide a smooth transition from one segment to another.
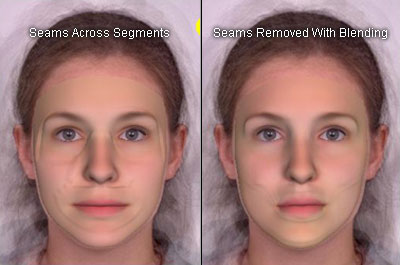
Seams across the segments were removed via blending of vertices
Step 3: Relight Face
The 3D face model is first alpha-blended at the boundary so that it will blend back into the original image. The entire 3D face is then further blended with the original image so that some texture information from the original image can be captured onto composited image.
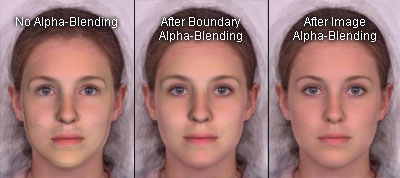
Applying alpha-blending to composite the 3D face back onto the 2D image
Finally, the 3D face is relit from another angle and our aim is achieved.
The above technique was tested on two faces of different gender and different head facing angle. The results obtained were pretty good, given the fact that only 5 eigenvectors were used.

Results of relighting a 2D image of a frontal female face

Results of relighting a 2D image of a slightly rotated male face
Skeel Lee: Face data sampling, optimization
Chia Wen Jie, Alvin: PCA, general graphics programming
Yap Chong Hwee: Alpha blending, general graphics programming

Is the result a 3d morphed head or just 2d?If its 3d then it looks very realistic.If so can you tell me how you achieved this?Can we do this also with only one or more pictures of the face?
I am very interested
thank you
Hi mitdrissa,
The result is a 3D model, not just a 2D image.
It’s done based on the research paper “A Morphable Model for the Synthesis of 3D Faces” by Blanz and Vetter, 1999.
One of the cool features of the algorithm is that only one face image is sufficient to generate the 3D model.
You could try FaceGen modeller if you need a off-the-shelf software that can do this. If I recall correctly, there’s a feature in FaceGen that allows you to supply front/side images of a face to create the 3D model.
Hope these info help!
thanks for the fast reply.But Facegen can’t produce realistic 3d heads like the ones you showed.Can you tell me step by step how to get these realistic heads.
which software do i need except facegen and what to do (maybe a summarized tutorial)?
So only one image is needed for a 3d head?Can it also get hair and other stuff or only the head?Can this 3d head be animated?
Sorry for the questions.This is very interesting.
thanks
We did use FaceGen in step 1 of the process. The mean face is then overlaid on top of photos of real people in later steps. Perhaps this is why you see them as more realistic?
Yes only one image is needed. The 3D mean face is then optimized onto this single image to form a 3D face that best matches the image.
It cannot match hair unfortunately.
The 3D head can be animated I guess, you just have to do the optimization per frame, and then somehow blend the per-frame heads over time. It is not attempted in this project.