CURRENTLY VIEWING |
||||||
|
GOOGLE SUMMER OF CODE 2013 WEEK 1
Basic augmented reality setup using WebRTC, Three.js and JSARToolKit
|
||||||
 |
||||||
|
@
projects > gsoc 2013
|
||||||
|
SECTION MENU
|
||||||
Week 1 of Google Summer of Code 2013 has just come to an end.
This week was mostly about trying to get a basic augmented reality setup working on the web browser using HTML5 technologies. I have looked at a variety of Javascript APIs that are necessary to get the application working, namely WebRTC, JSARToolKit and Three.js.
Before we get into details, let us first look at some of the video recordings for this week.
The screen recording above show the augmented reality program running in a web browser (Google Chrome). The background video of markers on mobile device is obtained from the JSARToolKit repository.
At the start of the recording, I was adjusting the threshold value to create a good black-and-white contrasty stream for marker detection.
The base of the cube sticks pretty well to the marker. However, it has some rotational jitter. This is something to look at in future weeks.
The above screen recording was a test with everything combined: WebRTC, JSARToolKit and Three.js. I was moving my webcam around my monitor which contained some markers. I was, again, adjusting the threshold value to create a good black-and-white stream for marker detection at the start of the recording.
2D marker tracking is pretty good with JSARToolKit. Marker detection is pretty fast too because it does marker tracking rather than using the slower template matching.
The most obvious problem in this video is the jittering of the 3D cubes, same problem as the first video.
The first part of this week was to stream video from my webcam to the web browser using WebRTC’s getUserMedia().
I have tried to use both Mozilla Firefox and Google Chrome for webcam streaming using WebRTC. For Chrome, I had to enable the “Enable screen capture support in getUserMedia()” flag in chrome://flags first. I have not tested my project with other browsers, but you can check whether getUserMedia() is supported if you happen to be using them.
I realized that a lot of the information that I found online were outdated even though they were published only a year ago in 2012 (yes, WebRTC support for Google Chrome and Mozilla Firefox has changed pretty rapidly over the past year). This means that there could be information such as “it only works with Google Chrome Canary” but it is already working in Google Chrome. What makes matters worse is that the flags change from version to version of Google Chrome, so there could be other flags that needs to be enabled in your current version, if you are following along. I think the best way is to get into chrome://flags and then search for “getUserMedia” or “WebRTC” and try to deduce if the relevant flags should be turned on. You might have to do a bit of trial and error here.
Just as a sanity check to make sure that I had the right settings on my web browser, I tested WebRTC on the official WebRTC demo app web page. A prompt appeared, asking me to allow access or share my webcam device. I accepted the request and got the webcam stream in my browser. This meant that my browser is ready for WebRTC. Sweet!
Note that the HTML files have to be served through a http server in order for WebRTC to work.. Initially I tried to just open the HTML files using the file:// protocol and I kept getting a “this site was blocked from accessing your camera and microphone” error. I have dabbled with node.js previously and liked its simplicity and features, so I decided to use it to get a basic server running locally. The instructions on this simple node.js http server setup page details how to get one running.
WebRTC, being a new web technology, has some differences between web browsers. Most notably, the getUserMedia() function has different prefixes for different web browsers, such as mozGetUserMedia() for Mozilla Firefox and webkitGetUserMedia() for Google Chrome and other webkit-based browsers. There is an official Google WebRTC page that talks about these differences. I am using a polyfill which handles the differences between Google Chrome and Mozilla Firefox, as provided in that page.
I have created a WebRTC test file in my GitHub repository that shows the codes needed to get a basic WebRTC getUserMedia() page running.
The augmented reality library that I am using for this project is JSARToolKit. It is a Javascript port of FLARToolKit, which in turn is a Flash port of the Java NyARToolKit, which is a port of the C ARToolKit.
It detects markers such as this:

Marker with ID 88
These are specially-encoded, low frequency markers that are easier and faster to track, as compared to the slower template matching method used for normal textures. Markers encoded from 1 to 100 are included in the markers folder of JSARToolKit respository.
JSARToolKit requires a <canvas> for tracking and detection of markers, so I fed the stream from my <video> to it by using the canvas.drawImage() method, on every frame. The frame looping is done using the requestAnimationFrame polyfill, as usual.
Once JSARToolKit detects a marker, it returns a 3D transformation matrix that I can use to place 3D objects into the appropriate space.
I wanted to write down the steps and codes necessary to get JSARToolKit to work, but there is a JSARToolKit tutorial at HTML5 Rocks which pretty much summarizes it all.
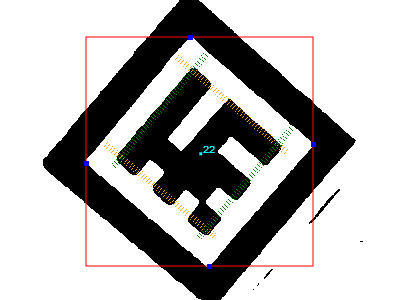
One thing that the article didn’t mention: JSARToolKit comes with a debug view that shows how the tracked video stream looks like, what it is currently tracking, and the IDs of the markers that it has identified:

JSARToolKit debug view
To turn on this debug view, just set a global variable DEBUG to true:
DEBUG = true;
and have a <canvas> with an id of “debugCanvas” somewhere in your page:
<canvas id=’debugCanvas’></canvas>
I found that I had to turn on “disable accelerated 2D canvas” in chrome://flags for Google Chrome Canary in order for the background contrasty black-and-white video to appear. Otherwise, I can only see the overlays i.e. the red box, the cyan marker id and the orange/green stripes.
I have created a JSARToolKit test file in my GitHub repository that shows the codes needed to get a basic JSARToolKit page running.
The next step is to get some 3D objects to stick nicely onto the detected 2D markers. WebGL is a natural choice for the web, but I have decided to use Three.js for the rendering. It is an excellent, easy-to-use rendering library that neatly wraps WebGL at a high level. Just some lines of codes to get a simple scene set up, as compared to the long setup codes for WebGL. Three.js also comes with a lot of very useful examples that covers a wide variety of situations.
The basic steps to integrate Three.js with JSARToolKit:
- Setup renderer: Create a
THREE.WebGLRendereras per usual - Setup camera: Get the camera projection matrix from JSARToolKit and use it to update the projectionMatrix of a Three.js
THREE.Camera - Setup scene: Create a
THREE.Meshfor sticking to the marker and aTHREE.Object3Dto hold this mesh. Also add some lights in the scene as necessary. - Setup a background video plane: Create a plane which contains a video texture in Three.js, then render this plane through another
THREE.Camerathat is always facing this plane, so that we get a 2D background in the 3D viewport. - Update: For every frame, get the transformation matrices of the detected markers and pass them to the Three.js
THREE.Object3Dfor correct placement. You need to, of course, update the tracked<canvas>and render the scene as well.
These steps are detailed in the same HTML5 Rocks tutorial. Some manipulation of the matrices has to occur so that we can map the JSARToolKit matrices to something that Three.js can understand.
Note that there is a missing line in the tutorial:
markerRoot.matrixWorldNeedsUpdate = true;
Without this line, the matrix of markerRoot will never be updated and it will not appear at the right position.
It should appear after:
markerRoot.matrix.setFromArray(tmp);
Also, I met with a bug which caused the track to look like a lot of slipping is occuring:
It is due to a one-frame lag in the background texture video stream. After tinkering for a bit, I found out that it was caused by the usage of the <video> element as the source of the background texture video stream, rather than the <canvas> that JSARToolKit uses for tracking. Looks like a one-frame offset is introduced while the <canvas> is copying data from the <video> on every frame.
I have created a Three.js with JSARToolKit integration test file in my GitHub repository that shows the codes needed to get a basic Three.js page running together JSARToolKit.
I am pleased to get all the different technologies working together as one application and iron out all the problems along the way. A lot of information online were outdated and there were also subtle bugs in the codes I found online.
The source codes for my project for this week is mostly an aggregation of codes that I have found online, just to make sure that everything is working well together. The method calls are littered all over the place without modularization. I wanted to leave the codes like this for this week so that they will help another person figure out how to integrate all the online source codes. I will do some refactoring next week for a cleaner and more user-friendly framework.
- Video of markers on mobile device by JSARToolKit
The source codes at the end of week 1 can be obtained from my ifc-ar-flood GitHub repository. Checkout the “GSoC_wk_01_end” tag to get the state of the source codes at the end of week 1.
If you are interested to try the demo that contains all of WebRTC, JSARToolKit and Three.js, please run index.html.
Please remember that you need to serve the HTML pages using a http server before you can see them as intended.

Very good and detailed explanation. I am working with AR as a University project, and if I know how to use the native ones I am clueless about the javascript ones. Helped me to understand a bit more.
Great that it helped
Hello Skeel I really love your toturial and your detail explanation

One thing I’m curious is how JSARToolkit map the marker and ID number? I mean for example, why marker 64 will have the shape like that? And I don’t understand why I saw you just import the JSARToolkit.js, no need markers folder but the app still can detect the marker with specific ID? maybe they encode binary or something like that?
Hopefully you will answer my question.
Again, thank you alot
Hi Sam,
More details can be found here: http://www.hitl.washington.edu/artoolkit/mail-archive/message-thread-00709-ID-based-Marker-Extensio.html. It explains how the number IDs are encoded into the marker patterns.
No template matching is done, so there is no need to import any marker images during run time. This is because JSARToolKit can analyze the pattern and figure out the ID directly, without a need to compare it to any images. The marker images in the markers folder are there for the user to print out and displayed to the web cam to be detected/identified.